How To Join the Ends of Binding: A Step-by-Step Guide

It’s important for any quilter — no matter the skill level — to know how to join the ends of binding. While binding a quilt can be a time-consuming process, it’s an essential step to completing most projects. Unfortunately, one of the trickiest parts of binding a quilt is joining the ends. If you don’t do it right, it can result in a sloppy or uneven finish. But don’t worry, we have a tried and true method for joining the ends of your quilt binding that will blow your mind!
The great thing about this method is that you won’t have to cut the ends off until you’ve sewn them together and checked that they fit perfectly. This makes it a lot easier to adjust the size of the binding if needed. Whether you’re sewing to the front of the quilt for a hand-finished binding or to the back of the quilt for a mock-hand binding by machine, this method will work the same way.
Step-by-Step Instructions
1
When you sew the binding to the quilt, leave yourself a generous tail at each end and plenty of space to work between the tails. I leave about 10 of space.

2
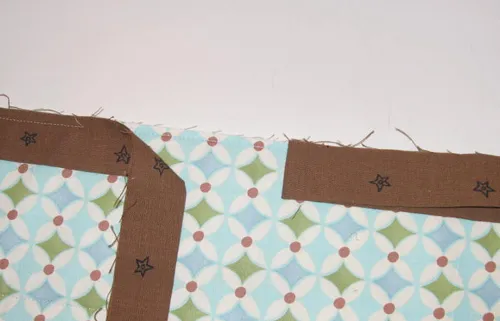
Lay the quilt flat on a work surface. Bring the ends together so they just meet near the middle of the space and fold each one straight back. You want the folded ends to meet nicely in the middle. Above, only the tail on the right has been folded back.

3
In this photo, both tails have been brought together so they just meet, and then folded straight back. I left a little gap so you could see what I mean.

4
Now take a sharp scissors and make a little snip of about 1/4 right on the folds.

5
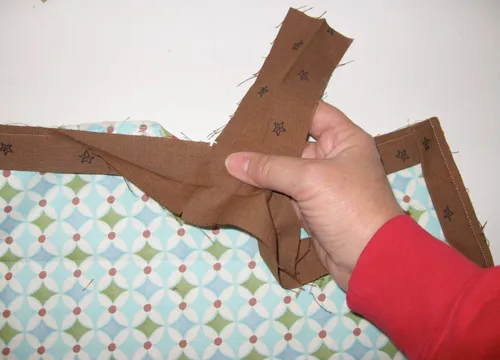
Now comes the part that seems to trip people up. Open up the binding on the right and flip it upward as shown above, keeping the right side up. The little snip will be visible (its between my fingers).

6
Open up the binding thats on the left side and take it across and toward the right as shown, right side down.

7
Here you can see that both sides have the snip. Youre going to match those little snips. They tell you where you need to sew.

8
This is how it will look. Youll have to scrunch up the edge of the quilt in order to match the little snips. Remember that the binding strip on the right should point up and away from you; the strip on the left extends across and toward the right. Pin the strips as shown below, matching the snips which are indicated in blue. The snips that are indicated in red will help you to line things up perfectly, with the strips at right angles.

9
Youre going to join the strips by sewing across the diagonal. Ive drawn a black line where youll sew. It helps to think of it as sewing from the top left corner across and down to the bottom right corner.

From our Shop
10
To help you see it more clearly, I made another sample, above. The pink and yellow strip represents the binding strip on the right, so its headed up and away from you. The gray strip represents the binding strip on the left, so its headed across and toward the right. The black line is where youll sew to join the strips.

11
I use a line marked on my table to guide me when sewing the diagonal. You could mark the diagonal if you prefer. Sew on that diagonal in order to join the strips.

12
This is how it will look. Be sure to use thread that matches the fabric, or blends well. I used light thread so you could see it, but thats a bad idea when youre doing it for real.

13
Now, before you cut anything, check to be sure that the binding fits nicely along the side of the quilt.

14
If it does, cut the tails off, leaving about 1/4 seam allowance.

15
Press everything nice and flat then finish sewing the binding to the quilt. Turn the binding to the other side and sew it down by hand or machine.

And now you know how to join the ends of binding! By following these simple steps, you can create a clean and professional finish for any of your quilted designs. Always remember to take your time and trust the process — with a little practice, you’ll be quilting like a pro in no time.
Enjoying this article? Sign up for our newsletter!


Easiest directions I’ve had in 10 years. Thanks.
Okay, WOW! Best, easiest binding join method… ever. Thank you so much for posting this because I was actually thinking this finish was beyond me. Any cool suggestions for small items like potholders?
Lifechanging! I was forever getting this wrong until I discovered your post and the magic notches. Thank you.
Thank you. This method worked out perfectly on the first attempt. I searched through many tutorials before finding yours. The instructions were so simple to follow for a beginner. I will use this tutorial again on my next quilt.